Monday, December 24, 2012

Christmas Angels

My last Christmas project are these angels that I've seen on various blog posts.  I made the first angel well before Thanksgiving.  Right away I had problems.  I could not locate my heat gun and my hanger hooks are not long enough.  I used glue and the shorter hooks.  The result was disappointing.  So I tabled that project until last week.

I now have a cheapo heat gun and instead of hooks I will use cords for a hanger.  Much better results.  When I was making these I thought of the children who died in Connecticut and how they're now little angels.  I added the little banner as my silent plea to end violence.  We need Peace on Earth.


I love how they turned out.  What I also like is that they're not flimsy.  The hot glue was the key.   Below is the group shot before I added the banner.


I gave some of these to the CCD teachers at church.  I'm also mailing a couple to an old friend who sent me a Christmas card this year.  I lost her address and I now have it.  She collects angels and I just know she would appreciate these.

Thank you for stopping by.  I wish you a Joyful Christmas and a Peaceful New Year.

Cheers!!!

irene

Pecan Tarts

Making pecan tarts has become a family holiday tradition for us.  My mom and two of my sisters take turns making them.  They're very tedious to make and over the years my Mom and sisters developed ways to speed up the process.  For instance, they use tortilla press to flatten the dough so it's even when you lay it on the baking tray.  In recent years, they've resorted to using mini muffin trays instead of the individual molds to bake the tarts.  Easy clean up and you get more uniform products.

They still chop the pecans by hand.  Manually chopping ten pounds or more of pecans seems so much work for me that's why I never got in the making pecans rotation.  Maybe in another ten years they'll get on the food processor band wagon.  LOL!!

I'm not allowed to post the recipe but I can tell you the ingredients.  Pecans, eggs, butter, vanilla, sugar, flour and cream cheese.  I think everyone love these pecan tarts because not only do they taste really good, they somehow remind people of something their "grandma used to make".  I've heard people say that so many times.

Start by chopping the pecans.  Then cook the filling.  While the filling is cooling off, you work on the dough.  Form little round balls when the dough is ready.  Flatten the balls and place them into the molds or muffin trays.  Fill the molds with the filling and bake.  This is what you get.


Once they're cool, we wrap them individually.  This is the process where I usually get involved.  And I get to taste test, yummy!  We sprinkle powdered sugar over them so they don't stick to the wrapper.


We use some kind of pastry wrapper cut to size.


Once they're all wrapped, we packaged them in clear bags and they're ready to give away.


I added tags to mine to give to the CCD teachers at church.  Remember the special tags from another post? The tags include the ingredients list in case people have food allergies.


Every year we have a family white elephant gift exchange on Christmas day.  My sister Ida and I came up with a gag gift to exchange on Christmas day.  She took an unused lunch box and filled it with pecan tarts but the twist is the addition of the diet tea, my idea.  We have relatives who count on us to bring pecan tarts every year and there won't be any this year unless they get the gag gift.


It'll be interesting to see if this gift will get pass around.  Our while elephant rule is you can "steal" the gift up to three times.

That's the pecan tart saga this year folks.  I thank you for stopping by.  Christmas is just a few hours away.

Until the next post ................ Cheers!!!

irene

Snowmen Tea Lights

Snowmen Tea Lights, another popular projects this season.  I thought they were cute when I first noticed them a few months ago.  I just had to try and make them since I have plenty of battery operated tea lights.


I wasn't too crazy about them once they're done so I only made two.  I like the cake tea light better.

Moving on to the next project.  Christmas Angels!  Check out future post.

Thanks for stopping by, until the next post............... Cheers!!!

irene

Christmas Gift Tags

We're all out of Christmas gift tags so I just had to whip up some quick ones.  The punches really came in handy and sped up this whole project.  I used the tag, scallop and circle punches. I also used some dimensional stickers that I recently found in my stash.  And I used mostly scrap cardstock that's why the colors are pretty limited.

Stamping was minimal, just the to and from until I found a set of stamps designed for tags.  I used a few of those.  Once I got started I could not stop.  When I noticed that I had quite a few done, I counted them and was surprised that I had done almost fifty tags!  We don't have fifty gifts to wrap so I forced myself to stop.  LOL!!


These other tags are a little more special and involved some thinking.  I only need a few and they will be used for the Pecan Tarts I'm giving away to the CCD teachers at church.  I will post the pecan saga separately.


I wanted to include the ingredients list on the tags, in case some people have allergies.

I have other projects I'm trying to finish and Christmas is upon us.  

Until the next post.................... Cheers!!!


irene

Wednesday, December 19, 2012

Holiday Treats

I made these fun snowmen last year.  Recently, I saw some postings with the same projects so I rummaged through my holiday stash to look for the leftover fleece from last year.  Luckily, I had some fleece that were already sewn, just need to cut to size. I found the template for the snowman in one of my flash drives, just need to print on cardstock.  One thing I don't have on hand are candy bars but I have a lot of granola and energy bars, which are basically candy bars masquerading as health foods!  Now I have everything I need to make some fun giveaway treats.


I wanted to give credit to the template designer but unfortunately I didn't have her name noted on my copy.  She designed the snowman image digitally and shared it on her blog.  All I did was format the image to print two to a page.

I trimmed the printed template to fit around the candy bar, or in this case granola and energy bars, and wrapped it around securing the edges with double-sided tape.

The hats were done with fleece remnants.  I took a 20" x 5" long piece, folded it in half and sew the ends (wrong side or inside, not sure what the proper term is) together.  You basically need a long "tube" made with fleece.  I cut about 5" from the long "tube" to form each hat.  Fold about 1/4" from one end twice.  Tie a string or cord an inch above the folded bottom, cinch tightly.  Cut the fringes above the string,

I cut a strip of fleece about half an inch by five inches for the scarf and tied that around the snowman.


Since I used leftover materials from last year, I struggled to put the hats on the snowmen but I got them on..  Last year I used Nestle Milk Chocolate bars and they're slightly narrower than the bars I used this year.  You can slide the bar from the opening at the bottom without destroying the design.

I had given some to kids already who thought they were cute.  But my son thought they were spooky when they were all lined up on my work table after I finished putting them together.  Oh, I just want to add that the energy bars are for adults like the mailman and the UPS delivery person.

One more week til Christmas.  Are you ready?

Thank you for stopping by.  Until the next post............ Cheers!!!

Tuesday, December 18, 2012

Christmas Cards

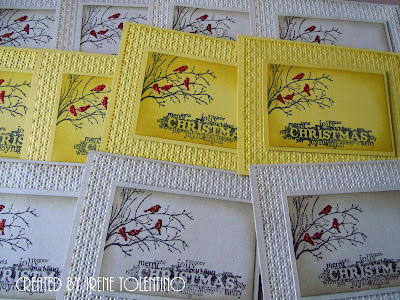
A quick post to share with you the Christmas cards I personally sent out this year.  When I went back to review all the cards I made since October to select a card design to send out this season, I was pleasantly surprised to see that I had so much to choose from.  I could not decide right away which one I would use.  I wanted something simple and easy because frankly, I'm running out of time.  I really like the red cardinals even though the card itself was more involved than I originally wanted.

I got them all done in one day and mailed with plenty of time to get to their destination before Christmas.  I wanted to do other colors but  in the end I stayed with just crumb cake and summer starfruit.


I have some extras so if you want one or two let me know.

Merry Christmas everyone!  Stay safe and be nice to your neighbors.

Until the next post............. Cheers!!!

Wednesday, December 12, 2012

Holiday Ornament

Everyone is abuzz about the ornament on the cover of Stampin'Up's Holiday Catalog.  Almost all my stamping friends made one exactly the same or with some color and element variations.  I had the same initial reaction as the others, which was "I can make this!"


I have all the tools and materials to make it but when I found out how to put it together I started wondering if it was worth all the time and effort.  There's a lot of stamping and die cutting involved but some creative types out there found ways to short cut the process.  When I finished my Christmas cards, I decided to go for it.  I used the same materials and color except for the linen thread where I substituted thin gold cords and I didn't have the large pearls so I left that out.


I think I did good.  The tulle needs to be trimmed and maybe I'll add a small pearl in the center after all.  I only burned my fingers with the hot glue a couple of times, nothing serious!


Someone made a red and white that I want to copy, it's very striking.

I have one more paper ornament that I want to do so stay tuned for that.

Thanks for stopping by.  Until the next post................ Cheers!!!

Tuesday, December 11, 2012

Chirstmas Square Collage

I finally put together the swaps I got back for the Christmas Square Collage.   My Christmas swap was posted  HERE.  Remember the Halloween collage swap?  This is the Christmas/Holiday version and next up is the Valentine collage due in January.

I found this 8" x 10" silver picture frame from my local paper outlet.  It was mark down with an additional 50% off so the final cost was $2.15.  It's perfect for my collage project.

Some of the swaps I got had so much dimension they would not fit in the frame.  I decided to "frame" them over the glass so I don't crush the designs.


One of the squares exceeds the 3/8" maximum size so I used it like a medallion on the frame itself.  Below are closer shots so you can see the details.


I really enjoy this square collage swap.  You get so much ideas from other stampers/crafters that you can incorporate with other projects.

I'm pretty much done with the card orders this season.  I'm now focusing on the fun stuff.

Until the next post............. Cheers!!!

Wednesday, December 5, 2012

Square Cone Christmas Ornaments

I'm finally getting around to making paper ornaments for Christmas.  This idea has been around for a few years now but it's one I haven't tried.  And then this weekend I saw a similar one at Target and thought I can make this.

Here are the three I have completed so far.  The big ones are roughly 8.5" wide and the small one is about 6" wide.


These were made with squares formed into a cone.  The blue and red were made with 3" and 2.5" squares.  The metallic chocolate was made with 2" and 1.5" squares.

Cut 12 squares according to your desired size.  You also need a round base, mine was cut from cardstock.  I used a 3.5" diameter for the big ones and a 2.5" for the small one.


I formed all the cones before adding adhesive to speed up the process.  The suggested adhesive is hot glue to hold the cone shape but I kept burning my fingers so I switched to double sided tape.  See photo below for adhesive placement.


As you complete a cone, place it on the circle base so you can see if you have enough squares.  Mine used 12 cones  for each layer but if your cones are narrower than mine, you might need 13 or more.  Make sure there's no gap between the cones.  I used a hot glue gun to adhere the cones to the circle base.  If you're adding ribbons, glue them in place as you do the cones.  Once the first layer is done, continue with the smaller cones to form the second layer.  Add a decorative focal point and a ribbon or something similar to hang your ornament.


The first layer of the blue one was done by alternating the designs.  Why you asked?  Because I messed up and applied adhesive on the wrong side of the paper on a few of the squares so I alternated the prints.  The second layer was all uniform.  You might not even notice it but I thought I'd bring it up to avoid confusion.   I used cherry tulle ribbon and silver thread for accents and pleated cherry ribbon for the hanger.


The design is better defined in this red one since I used uniform patterned cones on both layers.  I used lace ribbon and gold thread for accents and looped multiple gold threads for the hanger.


The chocolate metallic is simply gorgeous in real life.  I used lace ribbon for accents and hanger.  I've already cut up the squares in red metallic and green metallic for my next ornaments.  I'll add the pictures when I'm done.

There are other ornaments I'm itching to do but for now I have to get back to card making.  I still have one order to complete and another one that came in today that I need to get done fast.

Until the next post.............. Cheers!!!


Christmas/Holiday Cards Recap III

These are the available designs left  to choose from.

#1 

#2 

#3 

#4  

#5  

#6  

#7  

#8  

#9  

#10  

#11  

#12  

#13  

Friday, November 30, 2012

Christmas/Holiday Card #25 - Origami Star

The final entry in this series of cards for Christmas or Holiday is something I wanted to do since the beginning.  I made origami trees last year that were the focal point of my card and I wanted to try a different origami this year.

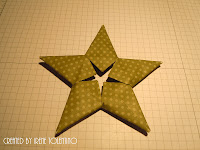
A search on the internet yielded a lot of ideas and I went with modular money origami star found HERE.  Tobias has a great tutorial and I was able to make a star in no time.  I didn't have origami paper and I didn't want to run out and get some just for this project.  I rummaged through my stash of paper and decided on a double sided olive green patterned paper.  Not too heavy and not flimsy either.

I'm not including instructions here for the star because Tobias' tutorial covered all the bases and is excellent.  One thing I would like to mention is if you decide to use regular patterned paper is to make sure you use a bone folder to burnish all the folds.  And I found that the more I burnish the softer and more pliable the paper became and that helps avoid tearing the edges.

Another thing is measurement.  I used 6" x 2-5/8" pieces to minimize scrap papers since most of my patterned papers are 12" x 12".  The star ended up to be about 4.75" x 4.75" too big for a standard A2 card. My card measures 6" x 5".  Here's the front and back of the finished star.


Obviously I want the star to stand out so the card layout is really simple but I went all out with the blings.  The star reminded me of the traditional holiday decorations in the Philippines called parol.  They're usually colorful and bright, see pictures below.  The picture of my card is not the best but you get the idea.


These are a few of the parols from the Philippines.


This is the more traditional one.


I enjoyed making all the cards for this series but I'm ready to do something else.  Stay tuned to find out what I tackle next.

Until the next post.............. Cheers!!!

Wednesday, November 28, 2012

Christmas/Holiday Card #24 - Pop Up Picture Holder

I'm almost caught up with my posts.  These cards were made at my sister's request.  She wanted cards that will "hold" pictures she wanted to send out for the holidays.

The construction is the same as the pop up gift card holder.  The exception is the size, these are 4.5" x 6" cards as opposed to the standard A2 cards.  These are pretty simple and easy to mass produce.  If you want information on how to create this pop-up card, see this POST.

With the first card, I rummaged through my stash bin and found the poinsettia embossed panel, die cut ornament and the small scallop circle.  So I basically created the card using those items.  I made the card base with pomegranate card stock to match the ornament and I selected the sentiment to fit in the small scallop circle.  I used lucky limeade ribbon because I liked the contrast between pomegranate and lucky limeade.


The second card is even simpler than the first.  I made the card base with white cardstock.  I stamped various size snowflakes all over the card front  and sponged the edges using Baja Breeze ink.  I stamped the sentiment with Midnight Muse ink and tied a ribbon around.  If I wasn't in a hurry I would have heat embossed some of the snowflakes.  But as it is, it looks very cool and crisp in person.


This is the inside with a picture inserted.  I found the snow flake patterned paper from my stash and that's where I got the design idea for the front of the card.


Hope you got some inspirations for your holiday cards from this series.  We're almost at the end, I will share the last one tomorrow.

Until then............. Cheers!!!

Christmas/Holiday Card #23 - Joy to the World

Hello my silent friends!  Nobody ever talks to me.  I was going through my stamp sets and noticed that I haven't used this stamp set this year.  We can't let that happen now, can we?

This technique is called emboss resist, the first technique I ever learned when I really got into card making over ten years ago.  Basically, you stamp your image with Versamark on a glossy card stock, heat embossed with clear embossing powder and then sponged whatever water based ink you want all over the embossed image.  Wipe excess ink with a paper towel.  The embossed image "resist" the background color you sponged and stays white just like your card stock.

I made a small variation in that I used white and green embossing powders instead of clear.  I started with a glossy card stock, heat embossed Joy in white embossing power.  Then I heat embossed the star with gumball green powder.  I masked the area below Joy and sponged gumball green ink above the masked line.  Then moved the mask above the green area and sponged cherry cobbler all the way to the bottom of the card stock.  I added a ribbon, three punched stars and some blings.  I mounted the panel onto a white card stock with dimensionals.


As you can see, the embossed images resisted the background color I sponged.   I really like how this turned out, hope you do too.


That's it for now, until next time............... Cheers!!!